...
- Once in Zeus, navigate to your Community Site.
- Create a new empty Page:
- Look along the left Toolbox menu. Select 'Pages' from the menu. Then, select the 'AddNew' button.
- Or, hover your mouse over 'Pages' and click 'Add New'.
- Look along the left Toolbox menu. Select 'Pages' from the menu. Then, select the 'AddNew' button.
- A blank web page with an Classic Editor appears.
- To use Zuse Create, change to the Zuse Create tab view.

- Select Start Building to begin laying out a page

Choose a layout to use for your page. Simple pages may only leverage one row for layout, consisting of one or more columns presented on the page. However, a page may contain any number of rows.

Note While it is possible to add many rows, it is highly recommended to avoid 'over-engineering' of a Page. Avoid using more than 2-3 rows in a page to keep pages simple, and to prevent long load times.
At the bottom of each column is an 'Add Module' button. Select to choose a Building Block to add to the Page.

Info Be careful what you put in a skinny column. Large blocks of text are hard to read in a small column. Skinny columns are good for things like menus, callouts and event or post lists, but you should avoid putting large blocks of text in a skinny column.
Select the Building Block to add to the Page layout. Add more than one if appropriate to all columns.

Info You can add more than one module per column. There is no need to have more than one row unless you want to have a different number of columns on different parts of the page.
- The page being edited should look somewhat similar to this:


- To use Zuse Create, change to the Zuse Create tab view.
- Select 'Save' to save a draft of the Page. This must be done once to define some additional options for the Page. Firstly, consider viability and status.
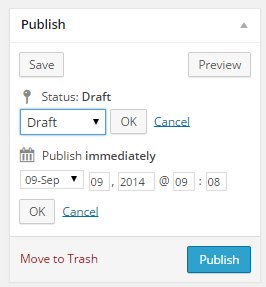
- Select 'Edit' to the right of 'Status' to change the status of the document. Options are Draft, or In Review. Use Draft to signal to other Site Administrators that creation is in-progress. Use In Review to signal to Editors that the document is ready for checking, style modifications, etc..
- To make a Page immediately viewable (which is not advised), select the 'Publish' button. Otherwise, select the 'Edit' link next to 'Publish'. A future date and time can be selected, which will effectively publish the Page at a known time in the future.
- Configure additional options for the Page
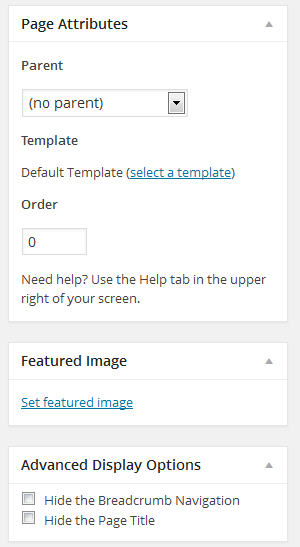
- Select a Parent. The Parent will help define the slug (URL of the web page) and if the page will appear in the site's navigation, the Parent will define the default location of the Page in the community site's menu.
- Select a Template. Select the 'select a template' link to choose the Template to use. Templates are created by Editor's and define layout and secondary content for a Page.
- Enter a number for Order. The Order defines a default listing order of Pages relative to each other in menus and lists of links. Note than in Navigation Menus, order can be overridden by editing a Menu.
- Edit the Page's Permalink to define a user-friendly web address for the Page. Ensure the name is all lowercase, with no spaces. If whitespace is needed for readability, use a hyphen (-) or underscore (_).
- Select a Featured Image to choose an image to appear near the top of the Page.
- Depending on the workflow of your office, notifications on page update may be appropriate. At the bottom of the Page view, look for 'Notifications'. Specify users, or groups which should be notified when the page being edited is updated, or a comment has been added.
- Example: To notify one Site Administrator that a page has been modified, look under the Users heading and either select the checkbox to the right of each user, or enter the first few letters of a username into the 'Search...' box.
- Example: To send a notification to all Editors in a Community Site, under the 'User Groups' heading, select the checkbox to the right of each kind of Site Administrator, either 'Authors' or 'Editors'.
- Select 'Save' at the top of the page to save all changes to the Page, and send any notifications which may have been chosen.
...