...
- Duplicate Policy Comment Form Template:
- Navigate from the dashboard to Collections > Forms.
- Hover over Policy Comment Form Template form and choose Duplicate.
- Edit duplicated form to include the policy number in the title: Hover over the copied form and choose Settings > Form Settings > Update Form Title. Update the title with the policy number and month and click “Update Form Settings.”
- Schedule the form to expire when the comments are due:
- From the Form Settings page, scroll down to Restrictions, check the Schedule Form box
- Enter the Schedule Form End Date/Time. No need to add a beginning date.
- Click “Update Form Settings.”
- Update the Directory Columns. This controls what items display on the website.
- Choose the “Directory Columns” menu item from the form menu.
- Drag the Name and Email Fields to the Hidden Columns list. Only “Comments” and “File” should be on the Visible Columns list. Save this change.
- Back on the Policy, update the “Policy Display Settings” box:
- Choose the appropriate form from the Comment Form dropdown.
You can override the auto display of the due date here if necessary.
- Choose the appropriate form from the Comment Form dropdown.
Add a Policy Update to announce the policy is open for comments
...
When adding a final policy to the website
Note: The below instructions describe how to replace the existing policy with a new version of the policy. If the change is small (like a short technical change), then it may be easier to edit the existing policy. To do that, navigate to the existing policy and choose the "Edit Policy" button in the header. Delete any draft policies used for comment.
- Update the text of the policy based on the signed copy of the policy. Stefan should be able to supply a Word Document copy of the final text.
- Remove the reference to the “Track Changes” and “Summary of Changes” documents from the top of the policy.
- Confirm that links and heading styles are still in place. See above for more details.
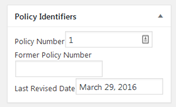
- Update the “Last Revised Date” in the “Policy Identifiers” box.
- Delete the “Track Changes” and “Summary of Changes” documents from the document collection:
- Navigate from the dashboard to Collections > Documents > Files.
- Hover over the documents associated with the policy and choose “Delete.”
- Disable the comment form:
- Navigate from the dashboard to Collections > Forms.
- Click the green slider next to the form associated with the policy. It should be grey to signify the form is disabled.
- Delete the version of the policy that is being replaced:
- Open the version of the policy that is being replaced.
- Print it as a PDF. Include the date in the name of the PDF and put it in the correct folder on the shared drive.
- Note the URL of the policy.
- Delete the old policy by editing it and choosing “Move to Trash.”
- Publish the new version of the policy:
- Edit the new version of the policy.
- Update the URL of the new version to match the old URL. (Skip this step if the policy name has changed.) Choose “Edit” next to the URL under the title of the policy.
- In the “Page Security” meta box, choose “(inherit).”
- In the “Policy Display Settings” meta box update:
- “Hide from the Policy List” is unchecked.
- “Pre Policy Title Header Text” is blank.
- "None” in the Comment Form Dropdown.
- “Notice Text” is blank.
- “Comment Due Date” is blank.
- Save the policy. It should now be visible from the main list of policies.
...

