...
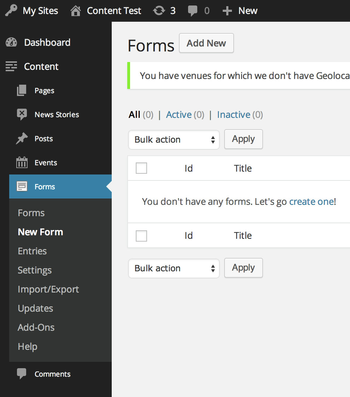
- On the left side menu, select Collections > Forms. You will see a list of your previously created forms.
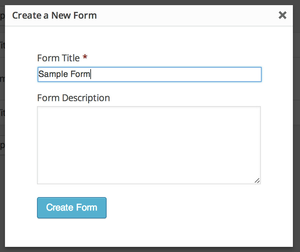
- To create a new form, click Add New next to the page title, and give your form a name. You can also include a description that can appear to site visitors to help explain the purpose of the form.
- Now begin to build your form. The New Form tool provides you with an easy way to create a new form. The form field toolbox on the left side of the screen is an accordion interface that allows you to select which field types you would like to add to your form. To add a form field to your form simply click on the field you would like to add and it will be added to the bottom of your form. There are four types of fields, although the first two are probably the most useful for us:
- Standard Fields are generic types of data you may want to collect. These fields are flexible, allowing you to collect all types of information.
- Advanced Fields include frequently used fields like name and email. They provide more structure and data validation and are preferred over standard fields when the option exists.
- Post Fields allow you to create forms that create post drafts that are saved to your site.
- Pricing Fields allows your form to calculate prices.
- Once you have added a field to your form, hover over the field you would like to edit and click on the Edit link. This will display the field editor interface and enable you to fine tune the available field options.
- Edit the Field Label to describe what data you are collecting.
- Optionally, add a description which displays to the user to give them more information about the form.
- You can define the available choices if your form is multiple choice. See Add Institutions as Multiple Choice 35958452 to add all UW System institutions to a choice field.
- There are many other options for the form fields, including requiring the field to be filled out and using conditional logic to control if the field displays based on answers to previous fields. Hover over the
 icon next to the field name to see more information about the options.
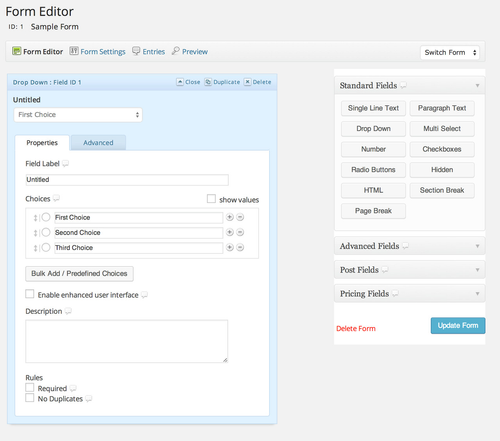
- Drag and drop the fields them to arrange them in the desired order.
- Preview your form by selecting Preview on the top menu. You must click the Update Form button to save the form before you can see the changes you've made.
- Edit the Form Settings found in the tool bar under the page title to edit the Notifications (automatic emails sent when the form is submitted) and Confirmations (behavior of the page after the user submits the form) as well as other settings.
- On the Form Settings tab, you can edit the form title and description, and specify other details related to the form. Use the options under Restrictions to automatically disable the form when a certain number of responses have been received or on a given date.
- On the Confirmations tab, edit the default confirmation to define the behavior of the page after the user submits the form. You can display a message, send the user to a page on your site, or redirect the user to any URL. In your message, you can include information submitted via the form. To insert form data into the message, use the drop down to the right of the Message text box to select the fields.
Confirmations can be configured to behave differently depending on the data submitted in the form. To do this, use the Add New button to create a new confirmation. The configuration is the same as the default confirmation configuration with the addition of Conditional Logic. Specify the logic to define when the alternate confirmation behavior should be used. - On the Notifications tab, build notifications to be used for the form. These are emails that go to admins or an email entered in the form. Configure who will receive the email and the message body. Using the default {all_fields} will give you a formatted table with the entries in the form. Use the Update Notification button to save the notification settings.
The default Admin Notification will go to the admin email for the website - webteam@uwsa.edu. This should be updated to your email address. If you don't want to receive emails about form entries, delete the Admin Notification.
Form submissions will also be saved in Zuse- see Manage Form Submissions 35958452.
- After you have edited the Form Settings and added your desired Form Fields, click the Update button at the bottom of the form editor to save your form.
- Don't forget to preview and test your form. Make sure your form looks correct and the information you collect will be submitted in a way that will be useful to you. Try out your form a few times and ask someone else to review it too.
...
- In the Outlook web app, choose the gear icon in the top right.
- On the left side menu navigate to Mail > Accounts > Block or allow.
- Enter the email that is sending your notifications (set up in the Notification, if it is {admin_email}, it is webteam@uwsa.edu) to the Safe senders and recipients list.
- Save your settings on the top of the page.
Prevent Spam Responses
If you are getting spam responses, there are several things you can do:
Setup Anti-Spam Honey Pot
This adds an invisible field to your form that catches bots and prevents them from submitting the form. This is an easy first step to implement.
To turn on the anti-spam honey pot, edit the Form Settings and check the box next to .
Add ReCaptcha to Form
Adding ReCaptcha adds a challenge to the form that shouldn't be able to be completed by bots.
First, you must ask the web team to set this up for your site. The web team needs to add our ReCaptacha key to the Gravity Forms settings page.
Once the web team adds the key, add the ReCaptcha field (found under Advanced Fields in the form editor) to the end of your form.
Use Login-only Page
If your forms only needs to be filled out by UW Users, you can use /wiki/spaces/URP/pages/2261023 to lock down your page. This will prevent spammers from submitting to your form.
Related articles
| Filter by label (Content by label) | ||||||||
|---|---|---|---|---|---|---|---|---|
|
...