...
- If it is a policy that currently exists, sometimes it is easier to clone the version that is currently online.
- Navigate to the list of policies. From the dashboard, choose Content > Policies from the left side menu.
- Find the policy you want to clone from the list. The easiest way to do this is to search for the name of the policy (searching for the number doesn’t work). Edit the policy.
- In the “Policy Identifiers” box, check the box next to “Policy Under Review.” This will mark it as under review in the table of policies.
- In the “Publish” box, choose the “Copy to a new draft” link.
- If you are adding a brand new policy, create a new policy and add the meta data:
- Navigate to the list of policies. From the dashboard, choose Content > Policies from the left side menu.
- Click the “Add New” button.
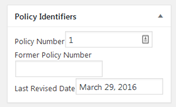
- In the “Policy Identifiers” box, add the Policy Number.
- In the “Section Number” box, choose the correct series.
- If this is a Procedure, Guidance or GuidanceQuestions, in the “Attributes” box, add the Parent. The parent should be the associated Policy. The Parent must be published before it will be available to choose.
- If it is Guidance or Questions, choose "Guidance" the appropriate option from the "Child Type" dropdown in the Policy Identifiers metabox. This option will only display once you have chosen a Parent.
- If the text or heading structure is totally new, delete the text that currently exists and copy the whole Word Document into the editor.
- Use “Paste as Plain text” by choosing the icon that looks like a clipboard from the second bar of the toolbar.
- If the text hasn’t changed that much, you can copy and paste only specific sections.
- If there are paragraphs that are the wrong font, highlight them and use the Eraser icon in the toolbar to delete the other formatting.
- Update the text to include the heading formatting.
- Headings should be semantic, the first level headings should be H2’s, second level headings H3, etc.
- Headings should be in title case, not all upper case. H4s and H6s will automatically display as all upper case. That is alright.
- Delete extra line breaks and other spaces.
- Sections should not be indented.
- There should not be blank lines between paragraphs or headings.
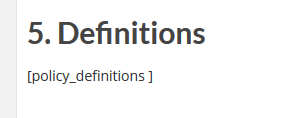
- Add the definitions to the policy.
- In the definitions metabox, add the definitions. If definitions are too long to be displayed in a tooltip, or contain rich text like bulleted lists, you'll need to include "See complete definition in policy" at the end of it.

- If no definitions were condensed, you can replace the definitions in the policy text with "[policy_definitions ]". This will display the definitions formatted for the policy.
- In the definitions metabox, add the definitions. If definitions are too long to be displayed in a tooltip, or contain rich text like bulleted lists, you'll need to include "See complete definition in policy" at the end of it.
- Add hyperlinks to statutes, other policies, regulations, and guidance in the policy text and Related Documents section.
- The links for the UW System Policies can be found here: https://www.wisconsin.edu/uw-policies/uw-system-administrative-policies/
- The links for the Regent Policies can be found here: https://www.wisconsin.edu/regents/policies/
- The links for the Wisconsin Statues can be found here (although sometimes it is easiest to just Google the statute number): https://docs.legis.wisconsin.gov/statutes/statutes
- Google other items or ask Stefan.
- Update the meta data of the policy:
- Confirm that the right Section Number is selected. The correct section number is determined based on the policy number.

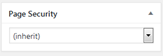
- In the “Page Security” box, choose “UW All” to require a login to view the policy.
- In the “Policy Display Settings” box (near the bottom of the page):
- Select the “Hide form the Policy List” checkbox. This allows us to publish the policy without the policy displaying on the main list of policies.
- In the “Pre Policy Title Header Text” enter “Draft Policy.”
- In the “Policy Identifiers” box, make sure “Policy Under Review” is not checked. Draft policies should not also be marked as under review.
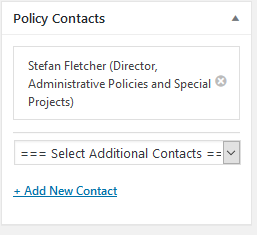
- In the Policies Contact Box, select the appropriate contacts from the drop down menu. If the contact hasn't been added before, use the Add New Contact link.
- Use the “Save Draft” or “Update” button in the publish box to save your changes.
- Confirm that the right Section Number is selected. The correct section number is determined based on the policy number.
- Make the “Track Changes” PDF, upload it to the website, post at the top of the draft policy:
- Save the “Track Changes” and “Summary of Changes” documents as PDFs.
- Add them to the document collection:
- Navigate from the dashboard to Collections > Documents > Files.
- Click “Add New” button at top of page.
- Click the “Select Files” button and choose the document you want to upload from your computer.
- Update the title to be human readable (eg. SYS 342 Summary of Changes)
- Select the category of “Draft Policy Documents”
- Click the “Add File” button.
- Repeat for any other documents.
- Link to the document from the policy.
- Edit the draft policy.
- At the top of the policy, add the text, “Also see the ”
- Add the document by clicking the “Site Files” button (looks like a stack of papers) from the toolbar. Choose the document that you just uploaded. You can search for it by the title you gave it.
- Click the “Insert” button.
- Highlight the text with a notice.
- Select the text you just added.
- On the second row of the toolbar (use the toggle toolbar button if you don't see the second row), use the "Formats" dropdown to select Alerts > Warnings. Text will be highlighted with a yellow background.

- Use the “Save Draft” or “Update” button in the publish box to save your changes.
- Publish the policy by using the “Publish” button in the top right.
...
Note: The below instructions describe how to replace the existing policy with a new version of the policy. If the change is small (like a short technical change)only to the text of the policy, then it may be easier to edit copy the text of the draft into the text of the existing policy. To do that, navigate to the existing policy and choose the "Edit Policy" button in the header. Delete any draft policies used for comment.
- Update the text of the policy based on the signed copy of the policy. Stefan should be able to supply a Word Document copy of the final text.
- Remove the reference to the “Track Changes” and “Summary of Changes” documents from the top of the policy.
- Confirm that links and heading styles are still in place. See above for more details.
- Update the “Last Revised Date” in the “Policy Identifiers” box.
- Delete the “Track Changes” and “Summary of Changes” documents from the document collection:
- Navigate from the dashboard to Collections > Documents > Files.
- Hover over the documents associated with the policy and choose “Delete.”
- Disable the comment form:
- Navigate from the dashboard to Collections > Forms.
- Click the green slider next to the form associated with the policy. It should be grey to signify the form is disabled.
- Delete the version of the policy that is being replaced:
- Open the version of the policy that is being replaced.
- Print it as a PDF. Include the date in the name of the PDF and put it in the correct folder on the shared drive.
- Note the URL of the policy.
- Delete the old policy by editing it and choosing “Move to Trash.”
- Publish the new version of the policy:
- Edit the new version of the policy.
- Update the URL of the new version to match the old URL. (Skip this step if the policy name has changed.) Choose “Edit” next to the URL under the title of the policy.
- In the “Page Security” meta box, choose “(inherit).”
- In the “Policy Display Settings” meta box update:
- “Hide from the Policy List” is unchecked.
- “Pre Policy Title Header Text” is blank.
- "None” in the Comment Form Dropdown.
- “Notice Text” is blank.
- “Comment Due Date” is blank.
- Save the policy. It should now be visible from the main list of policies.
- Update any children of the policy to point to the new version of the policy.
Add a Policy Update to announce a new policy is approved
...