/
Creating Accessible Documents
Creating Accessible Documents
- Rachel Klingler
Owned by Rachel Klingler
Create an Accessible PDF from a Word Document
These directions are for Word 2010 or 2013 on Windows. For other platforms, see Creating Accessible PDFs from Microsoft Word.
- To create an accessible PDF, your Word Document must have accessibility features including using headings and adding alt text to images. See Creating Accessible Documents in Microsoft Word.
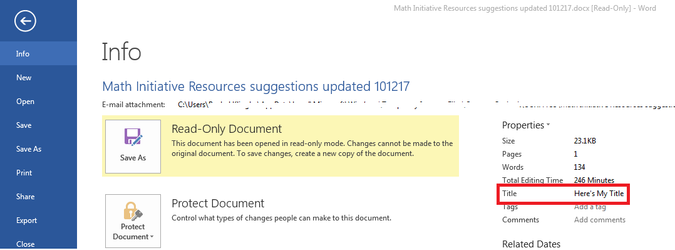
- You need to add a title to your document. On the File tab, on the right hand side under Properties, type a human-readable Title in the title section.
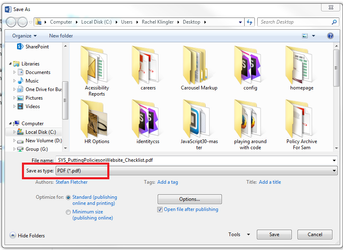
- Once you have completed your document using accessible features, go to File > “Save As…” and select PDF from the choices provided. By default this produces a PDF that preserves the document’s accessibility features. Do not use the "Print as PDF option."
- When saving, select Options and be sure that “Document structure tags for accessibility” is checked. This is checked by default, but could become unchecked under certain circumstances.

- If you select “Minimize Size” to reduce the size of your PDF, be sure to repeat the preceding step, as this option might uncheck the “Document structure tags for accessibility” checkbox.
Create an Accessible PDF from a Powerpoint Document
Like Word, if your original PowerPoint document is accessible, and you select the above options when creating the PDF from the PowerPoint, your PDF will be accessible. See PowerPoint Accessibility for more information on creating an accessible PowerPoint document.
Updating an existing PDF with Accessibility Features
The easiest way to make PDFs accessible is to start with the original document and use the steps above. If you have PDFs without originals, you can use Adobe Acrobat Pro to clean up the document. Please see Fixing Inaccessible PDFs Using Adobe Acrobat Pro.
Resources
, multiple selections available,
Related content
Creating an Accessible, Usable Web Site
Creating an Accessible, Usable Web Site
More like this
Replacing Documents
Replacing Documents
More like this
Upload or Update a Single Document/File
Upload or Update a Single Document/File
More like this
Doc Icon Shortcode
Doc Icon Shortcode
More like this
Putting Policies on the Website
Putting Policies on the Website
More like this
Using the Classic Editor
Using the Classic Editor
More like this