Add a Heading
- Karin Wrzesisnki
- Rachel Klingler
Headings make it easier for visitors to your page to find the information they are looking for quickly. Most people skim websites, and headings make it easier for them to do this.
When choosing your heading, remember what it means to have a heading in your code. Typically, the average user doesn't know much or care about your markup and whether or not it's semantically correct as long as it looks awesome and visitors can find what they are looking for. However, users that use assistive technologies, like screen readers, heavily rely on well implemented, structured, and meaningful markup.
To help make your site more accessible think about navigating through the <h1> and <h2> elements as allowing the user to understand the overall purpose of a page and how its content is structured. This could be similar to reading the table of context to a book. The <h3> through<h6> elements provide a quick understanding of the details in each section.
Add a Heading Using the Classic Editor
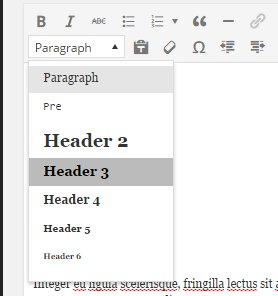
To add a heading using the Classic Editor, type your heading into the editor and highlight the text. From the dropdown, select the heading level you want. If you cannot see the style dropdown, click the toolbar toggle button. 
Add a Heading Using Zuse Create
To add a heading to your page using Zuse Create, make sure you understand Creating a Page using Zuse Create
Click Add Module and select Heading. Enter the heading text. The default heading is <h2> . If you would like to change the level of the heading, choose the Advanced Options link, and select the HTML tag from the dropdown. <h1> is the highest-level heading, and <h6> is the smallest.
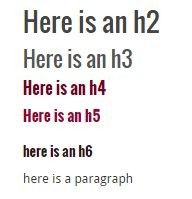
Heading Styles
When viewed on your page, the headings will be automatically styled, as seen below. For people using assistive technologies, it is important you choose heading types based on number instead of the style that you like.