Create a Page Using the Classic Editor
- Former user (Deleted)
- Rachel Klingler
- Former user (Deleted)
There are two modes of Page creation in Zuse: the Classic Editor provides a more traditional WYSIWYG (what you see is what you get) editor, while Zuse Create allows for a more visual, modular approach to page development.
The Classic Editor is available to all site administrators. The Zuse Create view is available to Editors. Both views are also used in other areas of Zuse.
Creating a New Page
- Once in Zuse, navigate to your Community Site.
- Create a new Page:
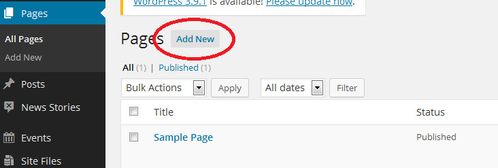
- Look along the left side menu. Select 'Pages' from the menu. Then, select the 'Add New' button.
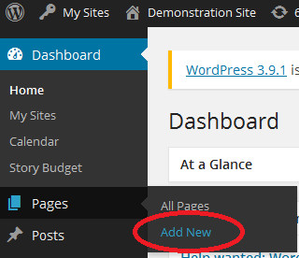
- Or, hover your mouse over 'Pages' and click 'Add New'.
- Look along the left side menu. Select 'Pages' from the menu. Then, select the 'Add New' button.
A blank web page with the Classic Editor appears. Enter information as appropriate. See Classic Editor (About) for information about using the editor.
Whenever you are using the Classic Editor, we recommend you keep the "Paste As Text" button on. This will prevent styling from Word or other places messing up the formatting on your page. Select the paste as text button and leave it selected as you work.

- Select 'Save' to save a draft of the Page. This must be done once to define some additional options for the Page.
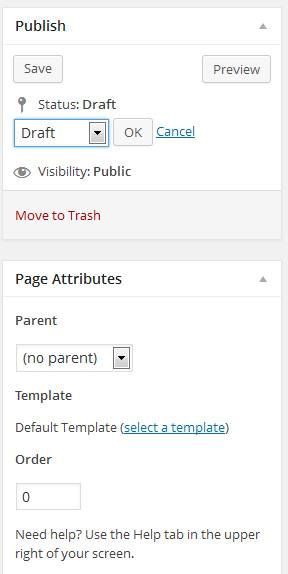
- Select Edit to the right of Status to change the status of the document.
- Author: Options are Draft, or In Review. Use Draft to signal to other Site Administrators that creation is in-progress. Use In Review to signal to Editors that the document is ready for checking, style modifications, etc.
- Editor: In addition to page modes for Authors, Editors can publish the page so that the page is viewable on the Internet.
- Select a Parent. The Parent will help define the slug (URL of the web page) and if the page will appear in the site's navigation, the Parent will define the default location of the Page in the community site's menu.
- Select a Template. Select the 'select a template' link to choose the Template to use. Templates are created by Editors and define layout and secondary content for a Page.
- Enter a number for Order. The Order defines a default listing order of Pages relative to each other in menus and lists of links. Note than in Navigation Menus, order can be overridden by editing a Menu.
- Select Edit to the right of Status to change the status of the document.
- Edit the Page's Permalink to define a user-friendly web address for the Page. Ensure the name is all lowercase, with no spaces. If whitespace is requried, use a hyphen (-) or underscore (_).
- If you are working on the page with someone else, editorial notifications for the page update may be appropriate. At the bottom of the page, look for Notifications. Specify users, or groups who should be notified when the page is updated, or an editorial comment is added.
- Example 1: To notify a Site Administrator that a page has been modified, look under the Users heading and either select the checkbox to the right of each user, or enter the first few letters of a username into the 'Search...' box. You will only be able to add users who are editors or authors of the site.
- Example 2: To send a notification to all Editors in a Community Site, under the User Groups heading, select the checkbox to the right of each kind of Site Administrator, either Authors or Editors.
- Select Save at the top of the page to save all changes to the Page, and send any notifications.
Once the Page has been saved, a message will appear indicating a successful save. Select View Page from the top menu bar to view the current version of the page.
See Using the Classic Editor for more information about the buttons available in the Classic Editor. See related articles below for information about adding specific items to your page using the Classic Editor.
When creating a Page, there will be access to both the Classic Editor, and the Zuse Create tab. Content entered into the Classic Editor does not automatically appear in the Zuse Create view. Content in the Zuse Create view does not automatically become usable in the Classic Editor.
Related articles