Create a Blog Post or News Story
- Former user (Deleted)
- Rachel Klingler
Very similar to other Blogs, Zeus Blog Posts are link pages and can contain images, text, and a variety of individual page elements. Blogs are organized chronologically and are typically organized by category – a grouping of posts of similar topic, tag – an ad-hoc list of subjects or keywords for a post, and by archive – organization by date. Blog Posts may be linked to directly, browsed in chronological order, by category, archive or tag.
Blog Posts are not a replacement for pages. They should be used for timely content. Blogs are typically updated daily, and must be updated at least 1-2 times per week. Before you start a blog, make sure you have a plan for keeping it up to date. If you need to post timely content, but don't have enough content for a blog, consider using News Stories instead. News is more formal in tone, and does not need to be updated as often as a blog.
Blog Posts and News Stories use the Classic Editor. Zuse Create is unavailable.
Creating a New Blog Post
- Once in Zeus, navigate to your Community Site.
- Create a new Blog Post:
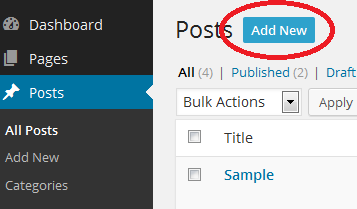
- Look along the left Toolbox menu. Select 'Posts' from the menu. Then, select the 'Add New' button.
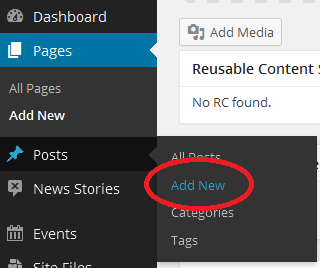
- Or, move your mouse over 'Posts' and click 'Add New'.
- Look along the left Toolbox menu. Select 'Posts' from the menu. Then, select the 'Add New' button.
- A blank Blog Post with the Classic Editor appears. Add desired information as appropriate.
- Select 'Save' to save a draft of the Blog Post. This must be done once to define some additional options.
- Select Edit to the right of Status to change the status of the document. The options are Draft, In Review, or Published. Use Draft to signal to other Site Administrators that creation is in-progress. Use In Review to signal to Editors that the document is ready for checking, style modifications, etc. Only Editors can change a post to Published. This allows to post to be seen on the Internet.
- Edit the Page's Permalink to define a user-friendly web address for the Page. Ensure the name is all lowercase, with no spaces. If whitespace is required, use a hyphen (-) or underscore (_).
- Select a Featured Image to choose an image to appear near the top of the Page.
- Select 'Save' at the top of the page to save all changes to the Page, and send any notifications which may have been chosen.
Once the Post has been saved, a message will appear indicating a successful save. Select 'View Post' to view the current version of the page.
Configure Blog
If you are using a blog, you must configure a Posts Page. If this page is not configured, the "Blog" link in the breadcrumb will not work. These steps are not necessary if you are using the News feature.
- Make a blank page with the desired title. (This will specify the URL of the page and what appears on the browser tab as the title of the page. "Blog" should work in most cases.) Publish this page.
- Navigate to Settings > Settings > Reading.
- In the drop down for Posts Page, select the page you created above. Do not select any other page, because the content on the page you select will not be accessible.