Posts and News Stories
- Karin Wrzesisnki
- Rachel Klingler
Creating a new Post or News Story is similar to creating at page. Both Posts and News Stories are under the Content menu.
The primary difference between Pages and Posts or News Stories is that Posts and News Stories are dated content presented in a feed, typical of blogs you may have seen elsewhere online. You can access these feeds via rss, and place them in content blocks in your site. Posts and News Stories do not provide complex layout options and should not be used as a substitute for pages.
The main difference between Post and News Stories is the tone. News Stories are more official postings, like press releases, while Posts may be more conversational. Posts can allow comments, but news stories cannot.
Create a New Post or News Story
The steps to create a News Story or Blog post are the same except for the menu you choose when creating your new content.
- On the left hand menu, select Content > Post > New Post to create a Post or Content > News Stories > Add New to create a News Story.
- Give your post a title.
- Creating the body of the post is very similar to creating a page using the Classic Editor. Add the main body of your post.
- You can create an Excerpt for your story. This is a summary of the story which will be displayed instead of the first few sentences of the post in places where the full text of the post is not displayed. This includes Post Lists added to pages on your sites and the main blog or news pages if you aren't displaying the full text of the posts. It is optional to create an excerpt; if you don't create an excerpt, your posts will be automatically truncated for display in these places.
Create an excerpt for a post by adding it to the Excerpt box which is usually below the post. If you want to add an Excerpt but don't see the box, select the Screen Options tab at the top right of the screen (under the "Howdy...") and check the box for Excerpt. Excerpts are plain text because they are often displayed without formatting.
- You can also specify the author of the post. The author is displayed on the post. If you want to change the author but don't see the meta-box, select the Screen Options tab at the top right of the screen (under the "Howdy...") and check the box for Author.
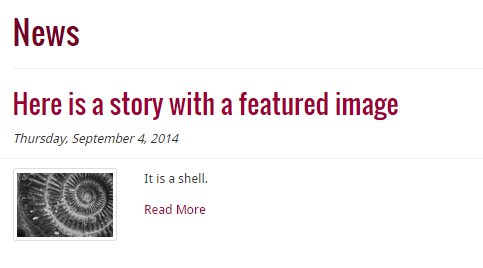
- Set a featured image for the story. You can set a featured image for the story by clicking the Set featured image link in the Featured Image meta-box. The featured image will appear on the post page, and on the News/ Blog page with the post.
- Give your post Categories and Tags. Use the Category and Tag meta-boxes to assign your post categories. These can help keep the posts organized, make it easier for visitors to your site to find information they are interested in, and be used to filter post feeds added to other pages.
- If you would like to save your work to come back to without posting the content, click the Save Draft button in the Publish meta-box. Posts are not saved automatically.
- When you are ready to publish your post, click the blue Publish button. Similar to pages, you can schedule a post to be published at a certain time. Before publishing the post, click the Edit link next to Publish immediately in the Publish meta-box. Choose the date and time you wish to publish your post. The Publish button should switch to a Schedule button. Click the Schedule button to schedule your post for publication.
Managing Comments on Posts
Comments are a way for visitors to the website to reply to your Posts. They are only available for Posts, not News Stories. By default, we do not allow comments on posts.
Comments are not enabled by default. Comments are only allowed on certain sites that are protected by a UW Group. Contact the Web Team at webteam@uwss.wisconsin.edu to request comments on your site.
Comment Moderation
Comment moderation means that comments from users on your posts don't automatically appear on the website for the public to view. This is useful to avoid spam and malicious comments, but it does require maintenance.
Comment Moderation Settings
There are some settings that control how comment moderation works.
- On the left side menu, select Settings > Settings > Discussion.
- Under the Before a comment appears and Comment Moderation headings there are settings to configure comment moderation.
- Check the Comment must be manually approved option to require approval for all comments.
- Select the Comment author must have a previously approved comment to not require moderation for persons who have had comments approved in the past.
- In an effort to reduce spam, any comment with more than two links will be held for approval. You can edit this setting under the Comment Moderation heading.
Approving a Comment
- After logging into Zuse, from your dashboard, you can see that there are comments waiting approval. If you hover over the comment on the dashboard, you can click the Approve link right there.
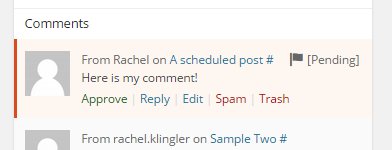
- If you have many comments to review, you can click the Comments link in At a Glance dashboard box. From the Comments activity, you can view all comments. At the top of the table, click the Pending link to view only comments waiting for approval.
- If the comment is spam or malicious, you can mark it as such by hovering over the comment and clicking Spam or Trash.
- You can also edit the comment or make a reply. Replying to a comment automatically approves the comment.
- Previously or automatically approved comments can also be removed from this page by hovering over the comment.
- You can view the emails of the people who have posted comments by navigating to the Edit Post page (click on the name of the post from the Zuse dashboard) and scrolling down to the comments metabox.
Turn off Comments for a Single Post
If comments are not enabled on your site, these settings are ignored.
If comments are in use for your site, you can override that and prevent visitors from commenting on a single post.
- Open your post. Select the Screen Options tab at the top right of the screen (under the "Howdy...") and check the box for Discussion. The Discussion box should appear.
- Uncheck the Allow comments option in the Discussion box to turn off comments for the post.
Turn Comments on for your site
To turn comments on for your site, you must contact the webteam. We only use comments on sites that are protected by a UW Group.
Author and Editor changes to the Allow people to post comments on new articles in Settings > Settings > Discussion will not be saved. This must be turned on by a member of the Web Team.
Display Full Posts on the Blog Page
You can choose whether you display the full post on the blog page or only an excerpt. Only excerpts are displayed on the news page.
- On the left side menu, select Settings > Settings > Reading.
- Choose Full text for the For each article in a feed, show option.
Related articles