Configure Your Site
- Rachel Klingler
Before you complete building your site, double check that you have configured the following pieces.
Specify the Title and Tagline
These appear at the top of all your pages.

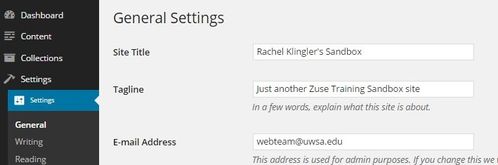
- On the left side menu, select Settings > Settings > General.
- Configure the Site Title and Tagline.
Specify the Main Red Menu
The main red menu appears on the red bar below the title of your site. It is the main navigation for community sites. Dropdown menus can be added to the main red menu, and they will appear when hovered on or toggled on a mobile device. The top tier of the Main Red Menu will be repeated in the second column on the footer navigation. It is recommend that the top tier of this menu does not exceed 8 items, or fewer if the menu titles are long.
- First, build the menu you would like to appear on the Main Red Menu; see Create a Menu.
- On the left side menu, select Collections > Menus.
- Near the top, choose the Manage Locations tab.
- Specify your Main Red Menu using the drop down box. This menu will automatically appear in the second column of your footer. You can also configure the third column of your footer here by selecting a Site Footer menu.
Configure the Footer

Specify the Contact Info
The site contact info appears on the right hand side of the footer of all of the pages of your community site. The contact info can be specified either at a community site level or on a page by page basis. Configure the contact information for your community site, and then override the contact information for certain pages if necessary.
Specify the Site-Wide Contact Info
- On the left side menu, select Settings > Settings > Site Contact Info.
- Configure the contact information. The heading should be the name of the person or office whose information it is; don't leave the default of "Contact."
Specify Page-Specific Contact Info
- Navigate to Content > Pages and select the page you want to override the site-wide contact information on.
- Near the bottom, locate the Contact Information meta-box.
- Configure the contact information. This information will filter down to any child pages of this page without their own contact information specified. If it is left blank, the site-wide contact information is used.
Specify the Third Menu in the Footer
Optionally, you can specify the third menu from the left on the footer. The first menu is the global menu, and the second menu is your main red menu. It is recommend that the footer menu does not exceed 8 items. Don't choose the same menu for the Main Red Menu and the Footer menu because the Main Red Menu is automatically added to the footer as well.
- First, build the menu you would like to appear on the third column of the footer; see Create a Menu.
- On the left side menu, select Collections > Menus.
- Near the top, choose the Manage Locations tab.
- Specify your site footer menu using the drop down box. This menu will be displayed in the third column of your footer. The second column of the footer is the Main Red Menu.
Select a Front Page and Posts Page
You can select any page to be your front page.
- On the left side menu, select Settings > Settings > Reading.
- Under the Front page displays option, select the A static page radio button and choose a front page from the drop down.
- Here you can also choose a posts page. This will place your blog posts on this page instead of the content you specified on that page in the Classic Editor or Zuse Create.
Specify Blog Name
The Post Page name will be used in the Header and Breadcrumb.
Related articles