Create and Manage Forms
Forms are a powerful tool that can be used to collect information from visitors to the site. For example, forms can be used for event registration or as a comment/question form.
Build a Basic Form
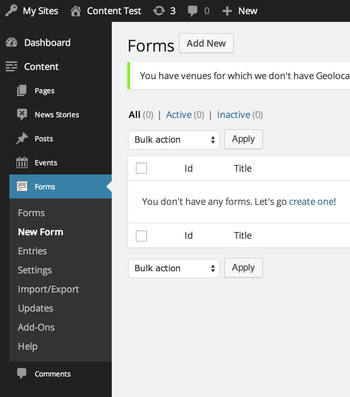
- On the left side menu, select Collections > Forms. You will see a list of your previously created forms.
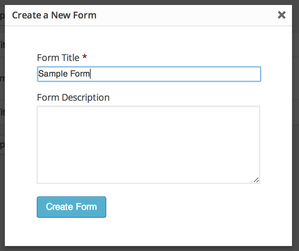
- To create a new form, click Add New next to the page title, and give your form a name. You can also include a description that can appear to site visitors to help explain the purpose of the form.
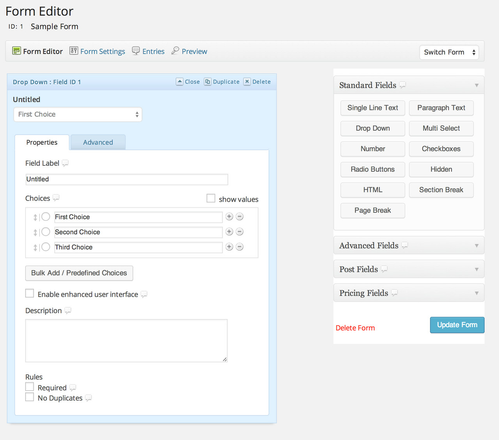
- Now begin to build your form. The New Form tool provides you with an easy way to create a new form. The form field toolbox on the left side of the screen is an accordion interface that allows you to select which field types you would like to add to your form. To add a form field to your form simply click on the field you would like to add and it will be added to the bottom of your form. There are four types of fields, although the first two are probably the most useful for us:
- Standard Fields are generic types of data you may want to collect. These fields are flexible, allowing you to collect all types of information.
- Advanced Fields include frequently used fields like name and email. They provide more structure and data validation and are preferred over standard fields when the option exists.
- Post Fields allow you to create forms that create post drafts that are saved to your site.
- Pricing Fields allows your form to calculate prices.
- Once you have added a field to your form, hover over the field you would like to edit and click on the Edit link. This will display the field editor interface and enable you to fine tune the available field options.
- Edit the Field Label to describe what data you are collecting.
- Optionally, add a description which displays to the user to give them more information about the form.
- You can define the available choices if your form is multiple choice. See Create and Manage Forms#Add Institutions as Multiple Choice to add all UW System institutions to a choice field.
- There are many other options for the form fields, including requiring the field to be filled out and using conditional logic to control if the field displays based on answers to previous fields. Hover over the icon next to the field name to see more information about the options.
- Drag and drop the fields them to arrange them in the desired order.
- Preview your form by selecting Preview on the top menu. You must click the Update Form button to save the form before you can see the changes you've made.
- Edit the Form Settings found in the tool bar under the page title to edit the Notifications (automatic emails sent when the form is submitted) and Confirmations (behavior of the page after the user submits the form) as well as other settings.
- On the Form Settings tab, you can edit the form title and description, and specify other details related to the form. Use the options under Restrictions to automatically disable the form when a certain number of responses have been received or on a given date.
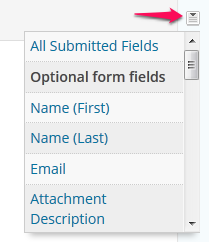
- On the Confirmations tab, edit the default confirmation to define the behavior of the page after the user submits the form. You can display a message, send the user to a page on your site, or redirect the user to any URL. In your message, you can include information submitted via the form. To insert form data into the message, use the drop down to the right of the Message text box to select the fields.
Confirmations can be configured to behave differently depending on the data submitted in the form. To do this, use the Add New button to create a new confirmation. The configuration is the same as the default confirmation configuration with the addition of Conditional Logic. Specify the logic to define when the alternate confirmation behavior should be used. - On the Notifications tab, build notifications to be used for the form. These are emails that go to admins or an email entered in the form. Configure who will receive the email and the message body. Using the default {all_fields} will give you a formatted table with the entries in the form. Use the Update Notification button to save the notification settings.
The default Admin Notification will go to the admin email for the website - webteam@uwsa.edu. This should be updated to your email address. If you don't want to receive emails about form entries, delete the Admin Notification.
Form submissions will also be saved in Zuse- see Create and Manage Forms#Manage Form Submissions.
- After you have edited the Form Settings and added your desired Form Fields, click the Update button at the bottom of the form editor to save your form.
- Don't forget to preview and test your form. Make sure your form looks correct and the information you collect will be submitted in a way that will be useful to you. Try out your form a few times and ask someone else to review it too.
You can use the Classic Editor or Zuse Create to embed a form on a page. See Embed a Form to insert your form into your page.
Advanced Options for Forms
Send a Confirmation Email
You can set your form up to send a confirmation email to someone after they submit the form. For example, send a registration confirmation to someone after they submit a registration from. Do this using the Form Notification feature.
- Make sure you are collecting an email in the form. You must use the Email field from the advanced fields to be able to send a confirmation to an email you collect.
- While editing the form, choose Form Settings > Notifications from the top menu.
- Choose Add New to create a new notification.
- Give your notification a Name. This is not viewed by users of the form.
- Under Send To choose the Select a Field radio button. Then, choose the email you would like to send the message to from the drop down.
- Configure your email. Choose a From Email, and enter a Subject and Message. To include information submitted by the user in the email, choose the drop down to the right of the message field.
- Choose the Save Notification button to save the email.
Expire a Form
You can set the form up to stop accepting submissions automatically on a certain date or after a certain number of submissions.
- While editing the form, choose Form Settings > Form Settings from the top menu.
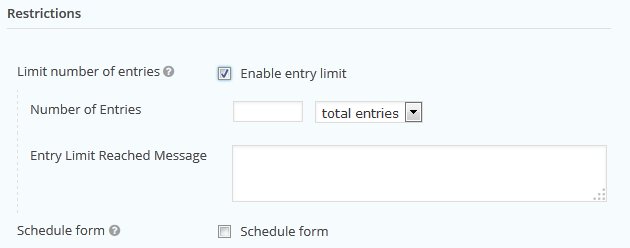
- In the Restrictions section, choose the Limit number of entries checkbox or the Schedule form checkbox to set active dates.
- Complete the settings. The Entry Limit Reached Message is displayed in place of the form after the maximum number of entries have been submitted. The Form Pending Message displays before Start Date of the form, and the Form Expired Message displays after the form's scheduled end date.
- Choose the Update Form Settings button to save your changes.
Inactivate a Form
Forms are inactivated by unchecking the circle next to the ID on the forms main page. Even if a form is unpublished, it can still be linked to from a Zuse Create module, Classic Editor, or an event. When a form is inactivated, it won't appear on any pages it has been added to.
Add Institutions as Multiple Choice Options
If you are using a choice option (radio buttons, drop down, multi select, or checkboxes), you can quickly add a long list of options (for example all system institutions).
- After you have chosen you field, hover over it and select the triangle on right side to edit the field.
- On the Properties tab, choose the Bulk Add / Predefined Choices button.
- In the text box on the right side, type in your choices. If you want to include all UW institutions, copy and paste from the list below.
- Choose the Save as new custom choice if you would like to use it again on another form. Give it an name and choose the Save button.
- Choose the Insert Choices button to add the choices to your form.
UW-Eau Claire
UW-Green Bay
UW-La Crosse
UW-Madison
UW-Milwaukee
UW-Oshkosh
UW-Parkside
UW-Platteville
UW-River Falls
UW-Stevens Point
UW-Stout
UW-Superior
UW-Whitewater
UW-Baraboo/Sauk County
UW-Barron County
UW-Fond du Lac
UW-Fox Valley
UW-Manitowoc
UW-Marathon County
UW-Marinette
UW-Marshfield/Wood County
UW-Richland
UW-Rock County
UW-Sheboygan
UW-Washington County
UW-Waukesha
UW Colleges
UW-Extension
Using Hidden Form Fields
Hidden form fields can be used to pass information to your form without the person filling out data entering anything. This could be useful if you have a form that is on multiple pages and you would like to know which page the user was on when they submitted the form.
Add an Admin Only field to your form
Admin only fields are not displayed to the site visitor when they are completing the form.
- Add a field of the data type you would like to collect in your hidden field.
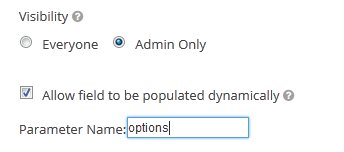
- On the Advanced tab of the field, choose the Admin Only radio button under the Visibility heading.
- To enable passing values to the field, choose Allow field to be populated dynamically, and give your field a parameter name without any spaces.
- If you are using a multiple choice field (like radio buttons, checkboxes, multi-select or dropdown), give each of your options a value. Choose the show values checkbox next to the Choices section, and give each option a value with no spaces.
- Save your form by using the Update From button on the right.
Pass a value to a hidden field
- Once you finish building your form, insert it using the Add Form button. You cannot pass hidden fields using Zuse Create. If you need to pass a hidden field on a Zuse Create page, insert the form using a Rich Text module.
- Update the Shortcode that was inserted by the Add Form button to include a field_values attribute with a parameter with the format "parameter-name=value to pass". You must include quotation marks around the parameter.
For example, to pass a value of "First-Choice" to the field with a parameter name "options", update the shortcode as follows:
[gravityform id="44" name="Deep Dive Registration" title="false" description="false" ] becomes
[gravityform id="44" name="Deep Dive Registration" title="false" description="false" field_values="options=First-Choice"] - To pass multiple hidden values, separate the fields with an ampersand. For example: [gravityform id="44" name="Deep Dive Registration" title="false" description="false" field_values="date=02-27-2015&location=Regent 213&topic=Forms"]
Collect Email from a Page Protected By Groups
This functionality must be turned on on a site-by-site basis by the web team.
Note to web team: activate the Gravity Forms Pass Shibboleth Login plugin.
If you have a page that is protected by the UW Groups, you can collect the email of the person who is logged in.
- Insert a Single Line Text field (if you want the email to be visibile and editable) or a Hidden field (if you don't want the person filling out the form to see the field) to your form.
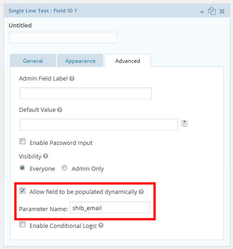
- Edit the field. On the Advanced tab, choose Allow field to be populated dynamically, and fill in the Parameter Name of "shib_email"
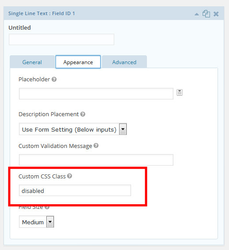
- If you would like the filed to be visible but not editable, add a Custom CSS class of "disabled" on the Appearance tab.
This form must be on a page hidden with the UW Groups feature to work. It may not work if you are logged into Zuse for editing and you view the page.
Forbidden Errors
If your form collects more longer text from people who are off campus, you may have issues with form submissions resulting in a Forbidden error. These errors are due to mod_security which is set up by DoIT.
The web team can set up exceptions to the security rules to prevent this error by following the instructions here.
Registration Form Template
The Web Team has created a form that you can import into your collections to get started building your registration form. Then you will only need to update any fields to customize your form and you will be good to go. See this blog post for more information about using forms for registration.
To import a form, on the left side menu, choose Collections > Forms > Import/Export. Then choose the Import Forms tab. Upload the and choose the Import button. Edit your form to customize it.
Customize Template Notifications
The form template includes an email confirmation sent to the email address provided by the person filling out the form. This must be updated with details about your event. To update it, choose your form for editing and then choose Form Settings > Notifications > Email Confirmation. Update the From Email and add a From Name if desired. Update the message with details about your event.
If you don’t want to include a confirmation email, you can delete it. On the Notifications screen, hover over the Email Confirmation and choose the Delete option.
If you would like emails when someone submits a registration, update the Admin Notification to send to your email address. Otherwise, delete this notification.
Use Forms for Scheduling
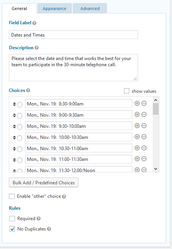
In some cases, you may want to have a radio button option that is removed once someone chooses that option. That is, only one person can choose each option. For example, you may want to offer time options for a phone call and once someone selects that option, no one else should be able to schedule at that time.
- To use this functionality, you must ask the web team to enable the "[UWSA] Gravity Forms: Remove Duplicate Options" plugin on your site.
- Create your form. You must include the phrase "Meeting Scheduling" in form description.
- Create a radio button field and enter the options for the field.
- Under the Choices, in the Rules section, check the "No Duplicates" option.
There are 3 conditions that need to be met in order for the option to be removed once someone has selected it (following the above instructions should make your form meet these conditions):
- “Meeting Scheduling” is in the Form Description. To edit the form description, choose “Settings” > “Form Settings”
- The field is a radio button field.
- The “No Duplicates” rule is checked.
Manage Form Submissions
Besides getting notifications based on form submissions, you can review the submissions in Zuse. From the left hand menu, navigate to Collections > Forms > Entries and select the form whose submissions you wish to review from the drop down box in the top right. You can review a list of the submissions, mark submissions as read or delete them. Clicking on a form submission will allow you to make notes on the submission.
Export Form Submissions to Excel
You can also export form entries for viewing/managing in Excel.
- On the left side menu, Select Collections > Forms > Import/Export.
- On the Export Entries tab, select the form whose submissions you would like to export.
- Select the check box by the fields you would like to export.
- If you are exporting in multiple batches (for example once per week), it can be useful to only export a certain date range. Use the Select Date Range option to only export entries submitted in a certain date range.
- Click the Download Export Files to generate and download your file. It will be a CVS file, which an be opened in Excel.
Delete All Entries
Entries should be deleted occasionally to avoid build-up in the database. Export entries (instructions above) to create a backup before deleting the entries.
- On the left side menu, Select Collections > Forms.
- Hover over your form, and choose Entries.
- Select all entries using the checkbox in the table header.
- Select “Trash” from the Bulk Actions dropdown.
- Click Apply.
Prevent form notifications from going to your Spam folder
Whitelist the email that sends your form notifications to prevent them from going to your Spam folder.
From the Outlook client:
- Click on the Junk E-mail folder.
- Right Click on the email that should not be in the Junk E-mail folder.
- Highlight “Junk” from the drop down list and move over the arrow to select your options.
- You can choose which option works best for you.
From the Outlook Web App:
- In the Outlook web app, choose the gear icon in the top right.
- On the left side menu navigate to Mail > Accounts > Block or allow.
- Enter the email that is sending your notifications (set up in the Notification, if it is {admin_email}, it is webteam@uwsa.edu) to the Safe senders and recipients list.
- Save your settings on the top of the page.
Prevent Spam Responses
If you are getting spam responses, there are several things you can do:
Setup Anti-Spam Honey Pot
This adds an invisible field to your form that catches bots and prevents them from submitting the form. This is an easy first step to implement.
To turn on the anti-spam honey pot, edit the Form Settings and check the box next to .
Add ReCaptcha to Form
Adding ReCaptcha adds a challenge to the form that shouldn't be able to be completed by bots.
First, you must ask the web team to set this up for your site. The web team needs to add our ReCaptacha key to the Gravity Forms settings page.
Once the web team adds the key, add the ReCaptcha field (found under Advanced Fields in the form editor) to the end of your form.
Use Login-only Page
If your forms only needs to be filled out by UW Users, you can use /wiki/spaces/URP/pages/2261023 to lock down your page. This will prevent spammers from submitting to your form.
Related articles
